
Machine Embroidery Process: Quality Custom Gear in Hanford
- Megan Robnett

- May 8
- 12 min read
Updated: May 26
Last week, a local contractor in Hanford discovered that his new bargain embroidered polos had logos that started unravelling after just three washes. It is a frustrating scenario that many businesses face when they prioritize low cost over the technical details of the Machine Embroidery Process. You want your team to look sharp and your brand to feel established, not messy or cheap. We agree that your custom gear should be an investment that lasts, which is why we focus on precision-engineered quality that stands up to the daily grind.

This article explains how professional embroidery transforms your logo into high-quality
apparel through a specialized computer process. You will learn exactly how your logo is prepared by converting your artwork into a perfect stitch file. We will also preview the importance of stitch density and how to find a reliable local partner right here in the South Valley. Let's ensure your next order of custom hats or workwear reflects the high standards of your business.
Key Takeaways
Learn how the professional Machine Embroidery Process uses computerized precision to ensure your logo looks sharp on every polo or hat.
Understand why digitizing is the essential translation step that maps out every needle drop for a clean and durable finish.
Discover the secret role of stabilizers and proper hooping in preventing the puckering that often ruins cheap custom gear.
Find out why working with a local Lemoore expert lets you see and feel physical samples before you commit to a bulk order.
What is the Computerized Machine Embroidery Process?
Have you ever wondered how a flat digital logo turns into a textured, professional emblem on a jacket? That's the Computerized Machine Embroidery Process in action. It's not like the hand-stitching your grandmother did or the basic sewing machine in your craft room. This process uses high-speed industrial machines that follow a digital map to place thousands of stitches with micro-millimeter precision. The system relies on three main components: the industrial machine, specialized digitizing software, and the substrate, which is the technical term for the apparel or item being decorated. While screen printing lays ink on top of the fabric, embroidery builds a 3D design into the material itself. This creates a premium look and feel that doesn't just sit there; it pops with professional texture.
The Evolution from Manual to Computerized
Embroidery has come a long way from the days of hand-guided hoops. Today's industry relies on computerized systems that ensure every single garment looks identical. This is why the Machine Embroidery Process is the gold standard for professional embroidered polos. Whether you need 12 shirts for a local Hanford sales team or 200 for a regional event, the first shirt will match the last one perfectly. In fact, multi-head machines are expected to hold nearly 70% of the global market share by 2026 because they deliver this exact kind of mass-production efficiency. For businesses in the Central Valley, this means your branding stays consistent across every employee, every time.
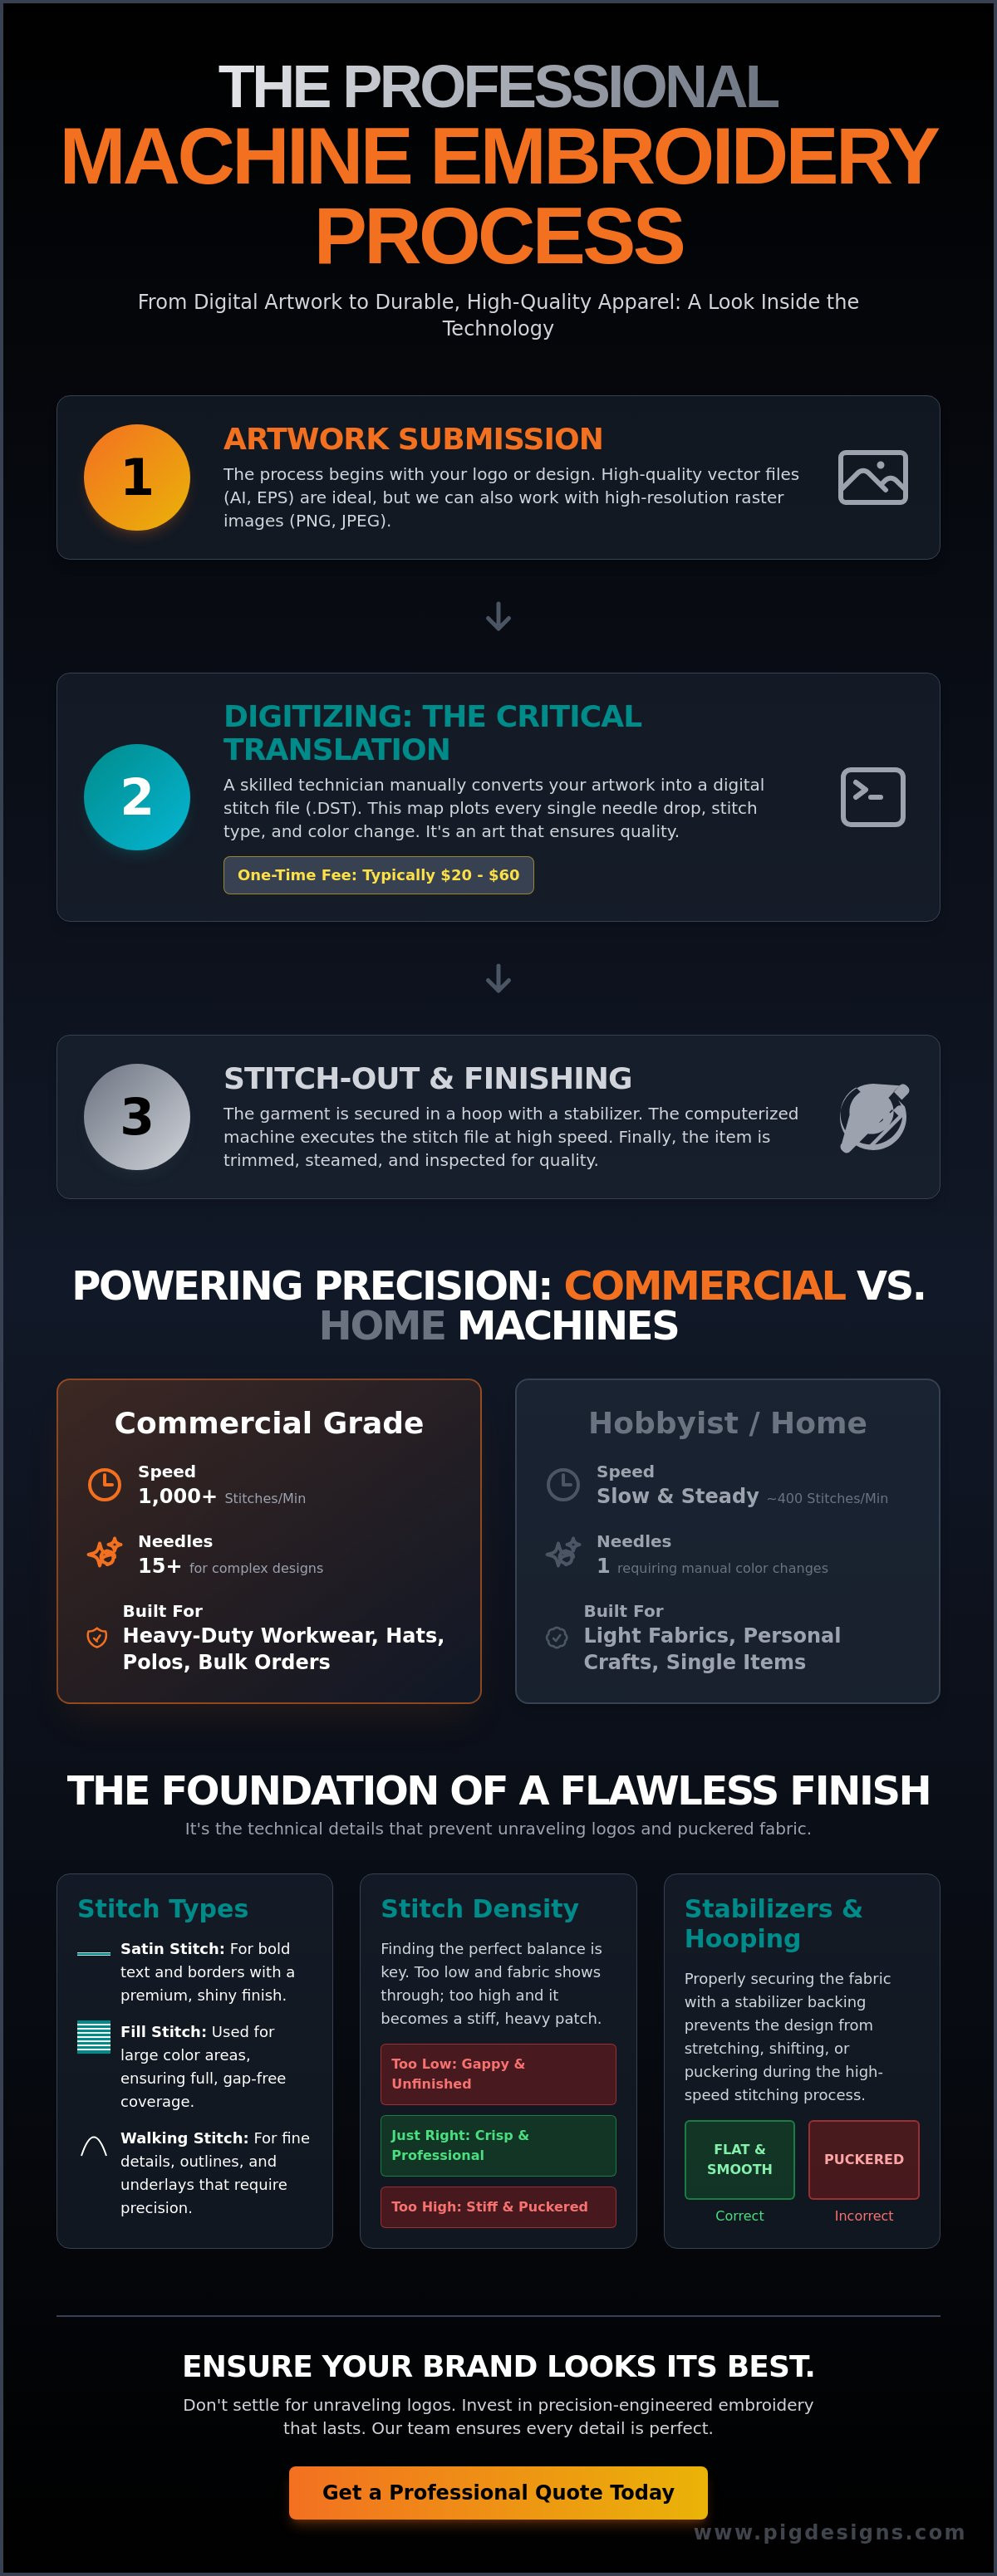
Commercial vs. Home Embroidery Machines
Don't let a hobbyist machine fool you. Commercial units are built for speed and power. While a home machine might have one needle and move slowly, industrial machines often feature 15 or more needles and run at speeds exceeding 1,000 stitches per minute. This power is necessary for heavy-duty items like thick hoodies or performance hats. These machines maintain tight tension even on structured fabrics, which prevents the design from sagging or losing its shape over time. It's the difference between a logo that looks "homemade" and one that looks like it belongs in a corporate boardroom. Professional-grade machines produce tighter, more durable designs that can withstand the rigors of workwear and frequent washing.
Digitizing: The Critical "Translation" Step
If you've ever tried to print a blurry photo, you know that the output is only as good as the input. The Machine Embroidery follows the same rule, but with a twist. An embroidery machine cannot read a JPEG, PNG, or PDF file. It needs a stitch file, like a .DST or .PES, which acts as a set of turn-by-turn coordinates for the needle. This is where digitizing comes in. It is the skilled translation of your artwork into a digital map that tells the machine exactly where to drop the needle. While some shops might offer a one-click auto-digitizing solution, these often fail because they don't account for fabric texture or thread tension. Professional digitizing, which typically carries a one-time fee of $20 to $60, ensures your logo looks crisp and stays durable. Additionally, good embroiders will do sample stitch-outs to make sure the logo is embroidering correctly before it goes onto your apparel.
Stitch density is another factor that separates the pros from the amateurs. If the density is too low, the garment fabric will peek through the thread, making your logo look cheap and unfinished. Conversely, if the density is too high, the design becomes a heavy, stiff patch that ruins the drape of the garment. Finding that perfect balance is part of the technical workflow described in The Stitch-Out: Bringing the Design to Life, where every needle path is calculated for maximum impact. When done correctly, the embroidery results in a design that feels like a natural part of the clothing, not an afterthought.

Stitch Types and Their Uses
A professional digitizer chooses from three primary stitch types to build your design. Satin stitches are the most common for text and borders; they create that classic, shiny, raised look that catches the light. Fill stitches are used for larger blocks of color to ensure complete coverage without leaving gaps. Finally, walking stitches are used for fine details and thin outlines that require extreme precision. By mixing these styles, we can recreate complex depth and texture on almost any fabric, from soft cotton to rugged workwear.
Pathing and Push-Pull Compensation
One of the most difficult parts of the process is accounting for the way fabric moves. When a needle hits the material at high speed, the fabric naturally stretches and shifts. Push-pull compensation is the adjustment made during digitizing to ensure circles stay circular. Without this manual correction, a round logo would come out looking like an oval. This technical expertise is especially important for high-detail projects like VFA squadron t-shirts, where every line of an aircraft or unit patch must be perfect. If you want to see how this attention to detail can elevate your brand, you can learn more about our approach to quality here.
Preparing the Canvas: Stabilizers and Hooping

Ever wonder why some embroidered shirts look great after fifty washes while others pucker and distort after just one? The difference usually comes down to the physical preparation of the garment. Even with a perfect digital file, the embroidery process fails if the fabric isn't secured properly. This is where hooping and stabilizers come into play. Hooping is the act of locking your garment into a rigid frame to ensure the fabric doesn't shift even a fraction of a millimeter while the needle fires at high speeds. If the hooping is loose, you get "ghosting," which is when the outlines of your logo don't line up with the filled colors. It looks messy, and it's a mistake we refuse to make.
While we spent time discussing the digital side in Digitizing: The Critical "Translation" Step, the physical foundation is what actually supports those stitches. This foundation is called a stabilizer, or "backing." It is a piece of non-woven material placed behind the fabric to give the needle something solid to bite into. Without the right backing, the thousands of needle penetrations would simply shred the fabric or cause it to collapse under the weight of the thread. We match the stabilizer to the specific weight and stretch of your apparel to ensure a smooth, professional finish that lasts as long as the garment itself.
Choosing the Right Backing
Not all fabrics are created equal. A thin performance polo needs more help than a heavy canvas bag. We use three main types of backing to ensure quality:
Cut-away: This is a permanent stabilizer that stays on the garment forever. It's essential for stretchy knits and polos because it prevents the design from stretching out of shape over time.
Tear-away: This backing is removed after the stitch-out. It's perfect for stable, non-stretch fabrics like denim or custom real estate signs printed on heavy fabric materials.
Water-soluble: Have you ever noticed stitches getting "lost" in the fluff of a towel? We use a clear, dissolvable film on top of high-pile fabrics to keep the thread sitting high and proud.
Specialty Hooping for Hats and Bags
Embroidering a flat polo shirts is one thing, but a curved surface like snapback hats is a whole different ballgame. To handle these, we use a specialized tool called a cap driver. It rotates the hat in a semi-circle so the needle stays perpendicular to the curved surface. This is a high-stakes part of the embroidery process. If the hat isn't centered or level, the whole batch is ruined. Our Lemoore customers expect a certain level of excellence, and our "Voted Best" precision standard means we check every hoop before the machine starts. We don't guess; we measure to ensure your logo is perfectly placed every single time.
The Stitch-Out: Bringing the Design to Life
Once the hooping is secure and the digital file is loaded, it is time for the most visible part of the process. This is where your brand colors come to life. We don't just grab a "close enough" blue; we match your specific Pantone colors to high-quality polyester or rayon threads. Polyester is the industry workhorse because it's colorfast and bleach-resistant, making it perfect for heavy-duty uniforms. Rayon offers a slightly higher sheen for high-fashion items. While some large online competitors claim the machine does all the work, our team stays hands-on. A standard left-chest logo often contains between 5,000 and 8,000 stitches, and we monitor every single one of them to ensure the tension remains perfect across every head of the machine.
Step-by-Step Machine Workflow
The actual stitch-out is a choreographed routine that requires constant attention. It starts by threading the needles with the required color palette. Each needle on our multi-head machines is assigned a specific color from your logo. Next, we calibrate the machine tension for the specific fabric type. A thick jacket needs different tension than a thin performance polo. Before we hit "start," we run a "trace" where the machine moves the hoop in the shape of the design without sewing. This ensures the logo fits perfectly within the safe area. Finally, we execute the stitch-out at speeds up to 1,000 stitches per minute while our operators watch closely for thread breaks or loose loops.
Quality Control and Finishing
The process doesn't end when the machine stops. Even the best industrial units can leave behind "jump threads," which are small strands of thread connecting different parts of the design. We manually trim these away and remove any excess backing to ensure the inside of the garment is as comfortable as the outside. This professional finish is vital for items like medical and nursing scrubs, where durability and comfort are non-negotiable during a long shift. We check for "nests," which are clusters of tangled thread that can compromise the strength of the design over time.
After trimming, we steam-press every item. This settles the stitches into the fabric and removes any temporary marks left by the hooping process. It's this level of care that has kept us voted best in Kings County year after year. If you want to see the difference that a meticulous local expert makes, learn more about our team and technology here. We ensure your gear arrives ready to wear and built to last.
Custom Embroidery in Lemoore: Why Local Expertise Matters
Are you tired of crossing your fingers and hoping your online order looks like the digital mockup? One of the biggest risks with faceless online brands is the "mystery box" effect. You don't know the thread quality, the fabric weight, or if the colors are actually accurate until the box arrives at your door. When you partner with a local expert for the custom embroidery, that uncertainty disappears. You can walk into a shop, feel the fabric of a performance polo, and see physical stitch samples before you commit to a bulk order. This hands-on approach ensures that the final product meets your standards the first time, saving you the headache of returns or wasted marketing budgets.
Beyond the quality of the thread, local knowledge plays a massive role in design success. We understand the specific needs of the South Valley. We know exactly which shades of purple and gold represent Hanford school pride and which navy blue is required for local law enforcement uniforms. This isn't information you can just "plug in" to a generic algorithm. Supporting the Kings County economy means you get a partner who is invested in your success. We provide a "super easy and convenient" experience that respects your timeline, offering quick turnarounds that online competitors simply cannot match without massive shipping fees.
Voted Best in Kings County for a Reason
Reputation is everything in a close-knit community. Being "Voted Best in Kings County" isn't just a slogan for us; it is a standard we have to earn with every single needle drop. We have spent years working with local staples like Lemoore High School and various South Valley sports teams to ensure their athletes and fans look professional. Whether it is a single graduation sign or a full set of corporate uniforms, we treat every project with the same level of precision. We invite you to learn more about our local team and process to see how we maintain these high standards.
Ready to Start Your Project?
Starting your next project is simple. You don't need to be a design expert or understand the technicalities of stitch files to get professional results. Just send us your logo, and we will handle the rest. We will provide a clear quote for the digitizing and apparel embroidery, so there are no surprises when the bill arrives. Most local businesses find that our turnaround times are significantly faster than national chains, allowing you to get your team into their new gear sooner. Quick Turnaround. Great Prices. Amazing Quality. Get started with Plain Insane Graphix today and see why we are the trusted choice for custom gear in Hanford and Lemoore.
Elevate Your Professional Image Today
Do you want your team to stand out with gear that actually lasts? We've shown how the machine bmbroidery process combines digital precision with physical craftsmanship to create durable, high-end apparel. From the meticulous translation of your logo during digitizing to the final steam-press, every step ensures your brand looks its best. You don't have to settle for messy logos or thin threads that unravel after a few weeks of wear. With over 20 years of local expertise, we know exactly what it takes to deliver amazing results on premium hat brands like Richardson and FlexFit. Ready to see your logo transformed? Request an Embroidery Quote from Plain Insane Graphix and let us handle the technical details for you. We're excited to help your business or team look professional!
Frequently Asked Questions
What is embroidery digitizing and why is there a fee?
Digitizing is the technical process of turning your artwork into a digital map of stitches. It's not a simple file conversion; a human expert must manually path every single needle drop. This is why a one-time fee, typically between $20 and $60, is charged for new designs. Once your logo is digitized by our local team, we keep that file on hand for all your future orders.
Can any logo be embroidered onto a hat or polo?
Almost any logo can be embroidered, but some intricate designs need small tweaks for clarity. Very thin lines or text smaller than 0.25 inches tall can get lost in the fabric. We'll look at your specific art and suggest minor adjustments to ensure it looks sharp on everything from performance hats to thick hoodies. We want your brand to look professional, not cluttered or messy.
How long does the machine embroidery process take for a bulk order?
A standard bulk order usually takes about 7 to 10 business days once your design is approved. The machine embroidery process involves several steps, including setup, digitizing, and the actual stitch-out on our multi-head machines. Since we're local to Lemoore and Hanford, you don't have to wait for long-distance shipping or deal with the common delays of a faceless national corporation. It's quick and reliable.
What is the best file format to provide for embroidery?
Vector files like .AI, .EPS, or high-quality .PDFs are the gold standard for professional embroidery. These formats allow us to see clean, scalable lines for the best digitizing results. If you only have a .JPG or .PNG, please make sure it's high resolution, ideally 300 DPI or higher. This ensures our team can see every detail of your logo before we start the production process.
Will the embroidery on my workwear fall apart after many washes?
Your embroidery is built to outlast the garment itself in most cases. We use high-quality polyester thread that is colorfast and resistant to bleach. Combined with permanent cut-away backing, your logo won't shrink, fray, or fall apart even after 50 or more industrial wash cycles. It's the perfect choice for rugged workwear that needs to stay looking sharp in the Central Valley heat.
Can you embroider on items I provide, like my own team jackets?
Yes, we can certainly embroider on items you bring in yourself. Whether it's a special set of team jackets or specific uniforms, we'll apply the same professional embroidery process to your gear. We also stock top-tier brands like Richardson and FlexFit if you need a reliable starting point for your project. Our goal is to make the entire experience super easy and convenient for you.
How many colors can I have in my embroidered logo?
You can use up to 15 different thread colors in a single embroidered logo. Our industrial multi-head machines are equipped with 15 needles, which allows for complex and vibrant designs. Most corporate logos only use 2 or 3 colors, but we have the capacity to handle detailed squadron patches or colorful sports emblems for schools throughout Kings County without any trouble.
What is the difference between embroidery and screen printing for logos?
Embroidery uses thread to create a 3D, textured design, while screen printing uses ink for a flat, smooth finish. Embroidery is the premium choice for headwear and polos because of its extreme durability and professional look. For large, detailed designs on the back of t-shirts, screen printing is often better because the final product stays lightweight and flexible for the person wearing it.


Comments